Simplepush Blog
Command Line Tools You Need to Know About
- 1. McFly (Intelligent Shell History)
- 2. yt-dlp (Video Platform Downloader)
- 3. Smartphone Notifications from the Command Line
- 4. firejail (Sandboxed Execution)
- 5. SSH tunneling
- 6. Quick HTTP server with Python
- 7. ngrok (Easy Access to Local Services)
- 8. Ncdu (Disk Usage Analyzer)
- 9. pdfgrep
- 10. autojump
If you are like me, you love doing most of your work with the keyboard and avoid using a mouse/touchpad as much as possible. Doing most things on the command line and optimizing the experience of your terminal emulator is a logical consequence of this preference.
Of course there are also other benefits to command line tools like resource-friendliness and the possibility to run them on remote servers.
In this article you will get an introduction to a bunch of great command line tools that hopefully will make you a more productive and happy command line user.
1. McFly (Intelligent Shell History)
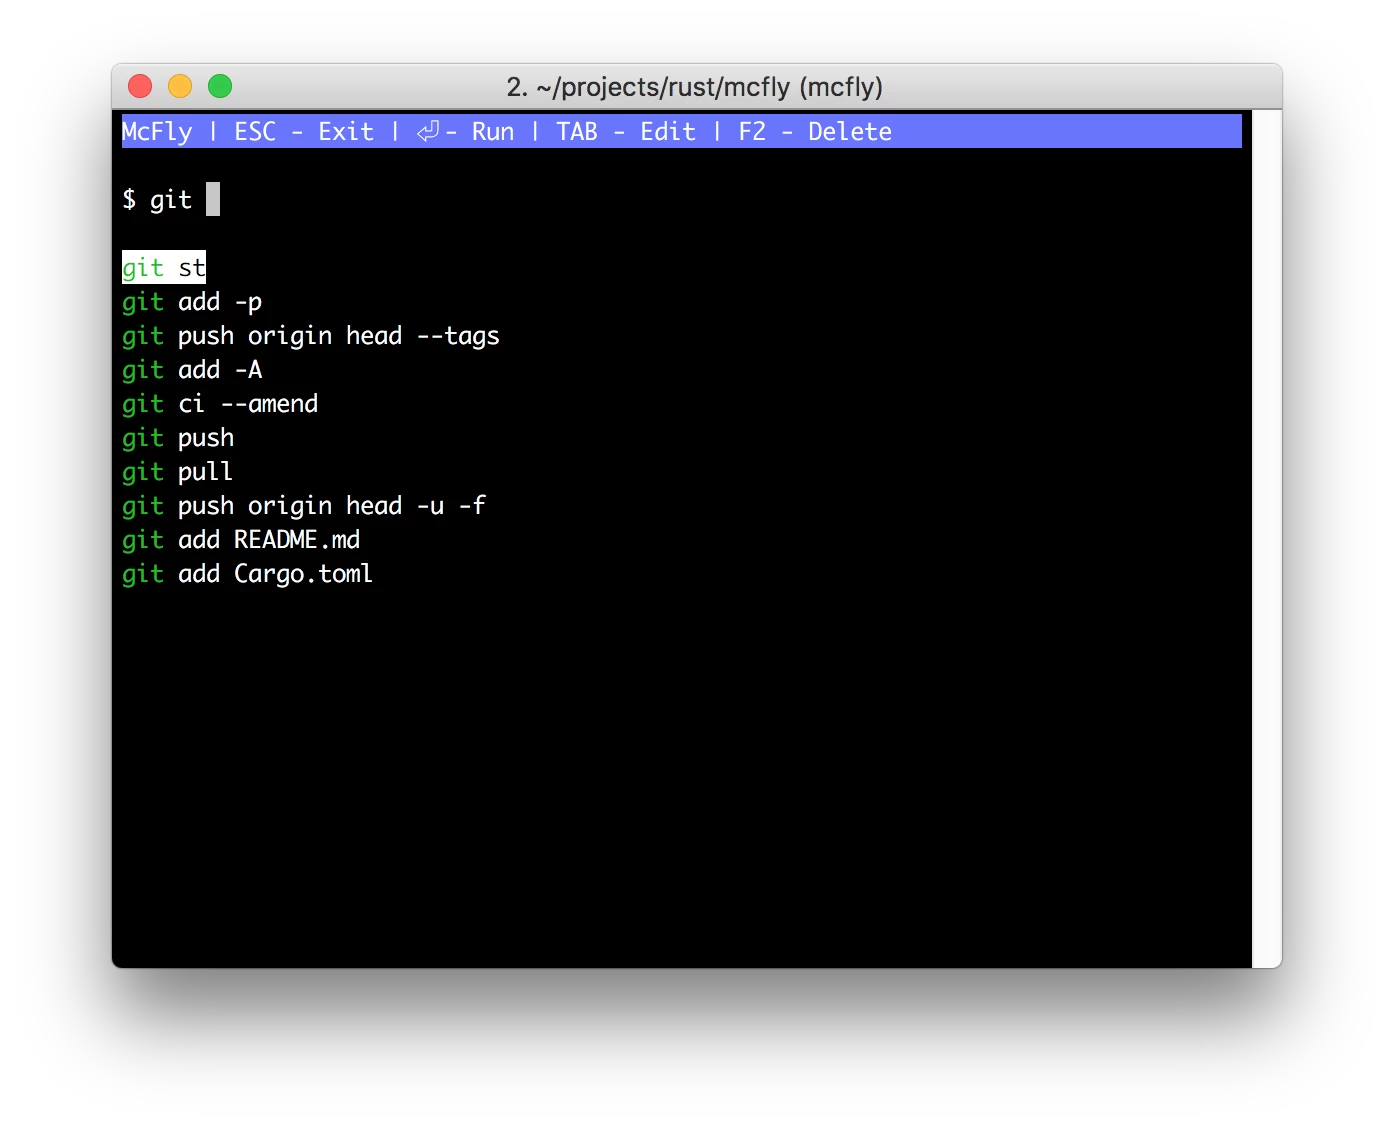
McFly enhances your search history (ctrl-r) with an intelligent search engine.
It provides you with history results that make sense to what you are working on at the moment.
The search engine takes the following things into account in order to predict the command you are about to type:
- The directory you currently are in.
- The commands you typed before the command.
- How often you ran the command before.
- When you last ran the command.
- If you have selected the command before in McFly.
- The exit status of the command (did the command successfully execute?).
Example:
You have cloned a Python project on Github a while ago and now you forgot how to activate the virtual environment that is needed to run the Python code.
After you cd‘ed into the project’s directory, you remember that it is something with activate.
You press ctrl-r, write ac and McFly reminds you that the command to activate the virtual environment is source venv/bin/activate.
Amongst other features, McFly supports fuzzy searching and a vim inspired key scheme!
McFly works in Bash, ZSH and Fish!
Two noteworthy ZSH plugins that share a similar functionality are Per-Directory-History and zsh-directory-history.
2. yt-dlp (Video Platform Downloader)
Yt-dlp is a command line tool to download Youtube videos. It can also download Twitch, Vimeo, Twitter videos, Instagram Reels and many more.
Once installed you can download Youtube videos as follows:
yt-dlp "https://www.youtube.com/watch?v=dQw4w9WgXcQ"

You can also get rid of the
"around the url if you escape the problematic characters in the url:yt-dlp https://www.youtube.com/watch\?v\=dQw4w9WgXcQSome terminal emulators do the escaping automatically once you paste the url into the terminal.
Downloading content from other supported platforms works the same way. For example downloading an Instagram Reel is as simple as:
yt-dlp https://www.instagram.com/reel/CX7MQOat2q8/
Another noteworthy feature is that you can easily download Youtube videos that require you to be logged in without passing cookies manually. Just tell yt-dlp about the browser you use (you have to be logged into Youtube on the browser that you specify as an option for yt-dlp).
yt-dlp --cookies-from-browser firefox "https://www.youtube.com/watch?v=dQw4w9WgXcQ"
This works with a bunch of browser such as Google Chrome (chrome), Microsoft Edge (edge), Safari (safari), Opera (opera), Brave (brave), Chromium (chromium), Firefox (firefox) and Vivaldi (vivaldi).
Other cool features of yt-dlp include downloading whole Youtube Channels and Youtube playlists, downloading Youtube videos with their subtitles and downloading all videos listed in a text file.
If you are an Ubuntu user, you can install it directly from the apt package manager.
sudo apt install yt-dlp
On MacOS you can install yt-dlp with brew:
brew install yt-dlp/taps/yt-dlp
Since yt-dlp is a Python script, it can also be installed with PIP (the Python package manager):
pip3 install yt-dlp
If you need to manually install yt-dlp, make sure you have ffmpeg and ffprobe installed.
3. Smartphone Notifications from the Command Line
When you write a small bash script or you have a long running process in a tmux session, it is often useful to have the ability to notify yourself or others of certain events.
Simplepush is an app for iOS and Android that makes this task straightforward. You can just download the app and immediately get a unique key that identifies your smartphone (no registration process at all). The unique key is everything you need to start sending notifications to your phone from the command line.
Let’s imagine the key that you got is HuxgBB.
Then the following curl command sends a notification to your smartphone.
curl https://api.simplepush.io/send/HuxgBB/message
If you don’t send more than 100 notifications per month, Simplepush is completely free. If you want unlimited notifications and all features, Simplepush costs just $9,99/year. To learn more, visit https://simplepush.io.
It is also possible to send end-to-end encrypted notifications with Simplepush from the command line. Just get this shell script and you are ready to go.
git clone git@github.com:simplepush/send-encrypted.git
cd send-encrypted
chmod +x simplepush.sh
./simplepush.sh -k HuxgBB -p password -s salt -m message
You can set the password in the app settings. This is also where you find the salt.
Another cool feature of Simplepush is that it is possible to create actions in the notifications you send. Actions are action buttons attached to a push notification that you receive on Android or iOS. Simplepush provides an API that let’s you query if and which action was selected.
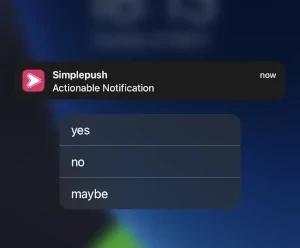
This gives command line users the possibility to send an actionable push notification and depending on which action was selected, pursue different paths inside of a bash script or directly on the command line.
You can learn more about Simplepush Actions in this article. There are also libraries that abstract most of the wiring necessary to leverage Simplepush Actions. Learn for example how to use Simplepush Actions in Python here.
4. firejail (Sandboxed Execution)
Firejail makes it possible to execute programs in isolation. These isolations have the goal of minimizing the potential damage a security issue in the software could have.
For example firejail can deny access to certain areas of the filesystem, the internet or even a webcam.
Firejail comes with a bunch of preconfigured sandbox configurations for popular programs which will be automatically applied when the program is started with firejail.
Another tool with similar functionality is AppArmor.
Once installed you can simply run a program in the firejail sandbox by appending the program’s name to the firejail command:
firejail firefox
If you also have installed the profiles (sandbox configurations for common programs), the previous command will run firefox in a sandbox as defined by the profile for firefox.
If the program you want to run in a sandboxed environment has no profile, you can manually adjust the permissions the program is allowed to run with by providing some command line options. Since all possibilites would go beyond the scope of this article, please checkout the manpage of firejail if you are interested in finding out more.
With the --private option you can for example hide all files in your home directory from a program:
firejail --private firefox
There are many more possibilites on how to restrict access to programs with firejail.
5. SSH tunneling
Let’s imagine you have a Raspberry Pi at home that runs some service which is not exposed to the Internet (e.g. Home Assistant). With SSH tunneling it is incredible simple to connect to that service while you are not connected to your local network.
ssh -L 8000:localhost:8123 pi@ip-of-your-raspberry
The previous command will forward port 8123 on your Raspberry Pi to port 8000 of your localhost. Therefore you will be able to access the Home Assistant instance of your Raspberry Pi in your browser on http://localhost:8000.
6. Quick HTTP server with Python
This is a neat trick if you want to share the content of a directory in your local network by creating a webserver.
Just cd into the directory you want to share and enter the following command:
python3 -m http.server
If you have Python 3 installed, this will create a webserver on port 8000 that lists all files in your directory and makes them available to download.
If you want to run the webserver on another port, just append the port number to the previous command:
python3 -m http.server 9000
If you are still running Python 2, python -m SimpleHTTPServer will do the job instead.
7. ngrok (Easy Access to Local Services)
Ngrok is a great tool that let’s everyone access your local service. This makes it really useful if you don’t have access to the router you are connected to and therefore can’t create port forwarding rules to the service you want to share with the rest of the internet.
It is free for non-commercial use but requires an account that needs to be created.
If you have a local HTTP server (for example by creating one with Python as described in the previous section), this HTTP server is most likely only available to your local network.
With ngrok you can just type ngrok http 8000 and open up the service running on port 8000 to the world.
After entering the previous command you should see something similar as the following in your terminal:
ngrok                                                                                                                                                         (Ctrl+C to quit)

Session Status                online
Account                       inconshreveable (Plan: Free)
Version                       3.0.0
Region                        United States (us)
Latency                       78.006541ms
Web Interface                 http://127.0.0.1:4040
Forwarding                    https://84c5df439d74.ngrok.io -> http://localhost:8000

Connections                   ttl     opn     rt1     rt5     p50     p90
                              0       0       0.00    0.00    0.00    0.00
Now everyone, including people outside of your local network, can access your service running locally on port 8000 by entering the Forwarding URL in their browsers.
To use ngrok you need to create an account on https://dashboard.ngrok.com/login. Once you created the account, you need to login. For that you need to get your ngrok Authtoken from the ngrok Dashboard. Afterwards you can login in your terminal with the following command:
ngrok config add-authtoken AUTHTOKEN
Another great use case for ngrok is quick access to your machine via SSH.
Just type ngrok tcp 22 and everyone with the correct credentials can login to your machine without any port forwarding necessary.
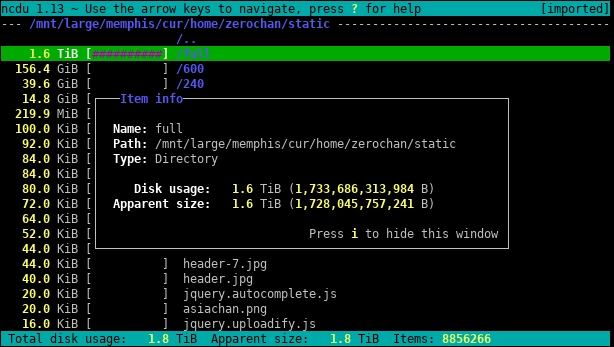
8. Ncdu (Disk Usage Analyzer)
Ncdu is a command line tool to find out why the hell your disk is full again.
It’s especially useful for finding big files and directories on remote servers where you usually don’t have the possibility to run tools with a GUI.
While finding the biggest files is also possible with some command line magic, I usually prefer the intuitive interface of ncdu.
It’s available on most package managers by default:
Debian/Ubuntu:
sudo apt install ncdu
MacOS:
brew install ncdu
9. pdfgrep
Pdfgrep is a useful tool to search text in PDF files from the command line.
A basic search for the text foo in a PDF file can be done as following:
pdfgrep foo file.pdf
If you already know grep, most command line options for pdfgrep will feel familiar to you.
For example if you want to perform a case-insensitive search, you can use the -i (or --ignore-case) option. The same works with the original grep.
pdfgrep -i foo file.pdf
One difference between text files and PDF files is that text files have no pages. With pdfgrep you can easily find out on which page a match was found. This is especially useful for huge PDF files.
pdfgrep --page-number -i foo file.pdf
Pdfgrep even supports password protected PDF files with the -password option:
pdfgrep --password [PASSWORD] foo file.pdf
Pdfgrep is available on most package managers.
For Debian-based systems:
sudo apt install pdfgrep
For MacOS:
brew install pdfgrep
10. autojump
Autojump is a great tool for a faster navigation to the directories you care about.
Let’s imagine you have the following directory: ~/src/my-dotfiles.
With autojump installed, you could just enter j dot to jump directly to the my-dotfiles directory.
Be aware that in order for autojump to detect the directory you want to jump to, you must have visited the directory at least once after installing autojump.
If you want to jump to a child directory of the directory you are currently in, you can use the following command instead. This makes it less likely that autojump will jump to a directory you didn’t want to jump to.
cd src
jc my
Other noteworthy features of autojump are opening a file manager (instead of jumping), with for example jo my, and using multiple arguments.
An example for using multiple arguments is you having another directory called my-dotfiles somewhere else than in ~/src. Then you could specify that you want to jump to ~src/my-dotfiles and not the other my-dotfiles folder, by entering j s my into your command line (as long the other my-dotfiles directory is not located in an directory that starts with s as well).
Autojump can be used within most shells and is available in many package managers.
Share on: